2025.11.14 (금) 10:01


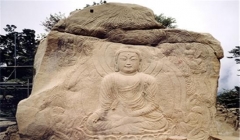
 대흥사 북미륵암 마애여래좌상 / 사진제공=해남뉴스 |
1) 개요와 위치
해남 대흥사 참배의 필수 코스인 북미륵암(이하 ‘북암’) 은 본사에서 도보 약 40분 거리에 있다.
이곳에서는 마애여래좌상(국보 제308호) 과 그 앞의 3층 석탑(보물 제301호) 을 한 자리에서 친견할 수 있다.
산중 고요 속에 웅대한 불성이 깃든 명소다.
2) 지정 경위와 학술적 배경
제작 시기 : 일반적으로 고려 초 조성설이 유력하나, 북암 주지 은성 스님은 통일신라 말에 장보고의 정치적 기반 안정을 기원해 조성했을 가능성을 제기한다.
근거로 마애불의 향하는 방향이 완도 청해진이라는 점을 든다.
국보 승격(2005. 9. 28.) : 본래 보물 제48호였으나, 마애불을 감싸던 용화전 해체로 상·하단 전체가 드러나 조형·규모·보존 가치를 재 평가받아 국보 제308호로 승격되었다.
3) 규모와 구성
전체 크기 : 가로 약 8m, 총 높이 약 6m의 암반에 돋을새김(부조) 으로 조각.
본존불 치수·자세 : 전체 높이 485cm, 신장 350cm. 연화문 대좌 위에 항마촉지인을 취해 앉아 있다.
4) 얼굴(상호)·광배 표현
상호 : 둥글넓적하고 원만하다. 통일신라의 ‘계란형’에서 고려 시대로 가며 사각형 경향이 강화되는 양식 전환기 특징이 드러난다.
이목구비 : 일자형 눈에 눈꼬리가 약간 치켜 올라 있으며, 미간에서 코로 이어지는 선이 높은 콧대로 입체감 있게 표현. 단정히 다문 입술이 근엄함을 더한다.
광배 : 불두 주변 세 겹의 두광, 그 밖으로 세 겹의 신광이 돌고, 주변은 화염문으로 장엄. 불두 위 암석의 자연 갈라짐도 확인된다.
5) 신체·법의·대좌
목·삼도 : 북암 마애불은 목이 굵고 짧아 보이는 인상이 특징. 통상의 삼도(三道) 대신 이도(二道) 만 새겨져 그 효과가 강화된다.
법의 : 양 어깨를 덮는 통견 형식, 가슴 중앙에 내의가 드러난다.
옷주름은 촘촘·규칙적이며 왼쪽 어깨의 가사 띠 고리 두 줄이 뚜렷하다.
대좌 : 아래로 향한 복련(覆蓮) 12엽과 위로 피어오르는 앙련(仰蓮) 11엽이 중첩되어 장중한 기단부를 이룬다.
6) 비천상(飛天像)의 배치와 의미
본존불 좌우 상·하단에 4구의 비천상이 조각되어 신앙 공간감을 강화한다.
상단 비천 : 연화대 위에 한쪽 다리는 완전히, 다른 쪽은 절반만 구부리고 앉은 자세. 화관과 영락장식을 갖춤.
하단 비천 : 무릎을 꿇고 본존을 우러르는 자세. 특히 좌측 비천은 향로를 높이 드는 모습이 뚜렷하다.
7) 전설: 천동·천녀와 ‘해를 묶은 천년수’
『나만의 남도 여행』(한얼미디어, 2006)에 따르면, 천동과 천녀가 옥황상제의 노여움을 사 지상에서 불상을 조각하라는 벌을 받는다.
낮 동안 완성하지 못하면 하늘로 돌아갈 수 없자 천년수(千年樹)에 해를 묶어 해가 지지 못하게 꾀를 낸다.
천녀—북암 여래, 천동—남암 미륵 : 두 곳에서 동시에 조각을 시작했는데, 천녀가 먼저 완성하자 해를 묶은 줄을 끊고 하늘로 올라간다.
천동은 미완의 입상을 남기고 올라가지 못해 두륜산 산신이 되었다 전한다.
현장 대응물 : 전설대로 북암에는 완성된 마애여래좌상, 남암에는 미완의 미륵불입상이 전한다.
8) 풍수지리 해석과 지형 상징
꽃게 형국과 석탑의 역할 : 전승에 따르면, 북미륵암 용화전 자리는 꽃게의 ‘몸통’, 동탑은 오른쪽 집게, 서탑(보물 제301호) 은 왼쪽 집게에 해당한다.
꽃게가 먹이활동을 할 때 몸통이 흔들리지 않도록 ‘움직임을 제어’하는 상징 장치로 탑을 세웠다는 해석이 전한다.
‘석범(石帆)’—돌 돛 : 길가 바위에 ‘석범(石帆)’이라 새긴 글자가 보이는데, 돌 석(石) + 돛 범(帆) 의 뜻이다.
대흥사 일원은 고계봉·노승봉·가련봉·두륜봉·도솔봉·연화봉·혈망봉·향로봉이 병풍처럼 둘러싼 분지형 지세로, 백두산 천지와 닮았다 하여 ‘소천지’라 불린다.
이 지세 속 북미륵암은 물 위에 떠 있는 형국이라 전하며, 그래서 돌로 ‘돛(帆)’을 세워 붙잡아 둔 상징이 석범이라는 설명이 전해진다.
즉, 풍수적 안정과 기운의 정박을 뜻한다.
9) 답사 동선 팁(현장 관찰 포인트)
본사 → 북암(약 40분) : 숲길을 따라 오르면 경내 진입.
3층 석탑 → 마애여래좌상 순으로 관람 : 탑의 균형미와 마애불의 장엄을 한 화면으로 조망.
세부 체크리스트
- 광배의 세 겹 두광·세 겹 신광, 주변 화염문
- 목의 이도(二道), 왼쪽 어깨 가사 띠 고리
- 대좌의 복련 12·앙련 11 중첩
- 좌우 비천상 4구의 자세·장식
남암 연계 : 시간이 허락하면 남미륵암으로 이동해 미완 미륵입상을 확인하면 전설 서사가 완결된다.
풍수 포인트 : 경내에서 동·서탑 위치 관계를 꽃게 형국으로 대응해 보고, 하산 길에 ‘석범’ 각자를 찾아 돌 돛의 상징성을 곱씹어 본다.
한 줄 정리
북미륵암 마애여래좌상은 통일신라 말~고려 초 양식 전환의 단서, 2005년 용화전 해체로 전모가 드러나 국보로 격상된 사연, 비천상·광배·대좌의 치밀한 조형, 천동·천녀 설화와 남암 미완 미륵의 현장 대응,
여기에 꽃게 형국·석범(石帆) 으로 읽는 풍수 상징까지—역사·조형·설화·지세가 한 자리에서 맞물린 종합 유산이다.
[Haenam = Haenam News] haenamnews@kakao.com
North Mireuk Hermitage (Bukmireukam) Seated Rock-carved Buddha at Daeheungsa Temple, Haenam
A Field Guide through History, Form, Legend, and Geomancy
1) Overview and Location
The North Mireuk Hermitage (Bukmireukam), an essential stop on a pilgrimage to Daeheungsa Temple, lies about a 40-minute walk from the main compound.
Here, visitors can view both the Seated Rock-carved Buddha (National Treasure No. 308) and the Three-story Stone Pagoda (Treasure No. 301) before it—an encounter with serene grandeur amidst the stillness of the mountain.
2) Historical Background and Designation
Estimated Date: Scholars generally attribute the carving to the early Goryeo period. However, Ven. Eunseong, the current abbot of Bukam, suggests it may date back to the late Unified Silla period, possibly created to pray for the political stability of Admiral Jang Bogo’s maritime kingdom. He points out that the Buddha faces Cheonghaejin in Wando, Jang Bogo’s stronghold.
National Treasure Designation (September 28, 2005): Initially listed as Treasure No. 48, the sculpture was upgraded to National Treasure No. 308 after the dismantling of Yonghwajeon Hall revealed the Buddha’s entire upper and lower sections, confirming its artistic and historical value.
3) Scale and Composition
Overall Dimensions: Approximately 8 meters wide and 6 meters high, carved in low relief (bas-relief) on a rock face.
Main Image: The Buddha measures 4.85 meters in total height, with a body length of 3.5 meters. He sits cross-legged on a lotus pedestal, performing the earth-touching mudra (Bhumisparsha mudra), symbolizing enlightenment.
4) Facial Expression and Aureole
Face: Broad and full, reflecting the stylistic transition from the oval faces of late Silla Buddhas to the more square forms of the Goryeo period.
Features: Straight eyes with slightly upturned ends, a long, high-bridged nose connecting smoothly from the brow, and firmly closed lips expressing solemn dignity.
Aureole (Halo): Comprises three concentric head halos and three body halos, surrounded by flame motifs, while natural cracks in the rock remain visible above the head.
5) Body, Robe, and Pedestal
Neck Folds (Samdo): The Buddha’s neck appears thick and short, with two folds (Ido) rather than the usual three, a unique stylistic feature.
Robe (Beopui): Draped over both shoulders in full-coverage style (Tonggyeon), with an undergarment visible at the chest. The fine, even pleats and the double sash ring on the left shoulder are delicately rendered.
Lotus Pedestal: The base consists of 12 downward-facing lotus petals (Bokryeon) beneath 11 upward-facing petals (Angryeon)—a double-layered composition symbolizing the harmony of heaven and earth.
6) Celestial Attendants (Bicheonsang)
Four celestial figures (Bicheon) are carved around the Buddha—two above and two below—enhancing the sacred spatial atmosphere.
Upper Bicheons: Seated on lotus thrones, one leg fully bent and the other half-folded, wearing flower crowns and jeweled ornaments.
Lower Bicheons: Kneeling and gazing reverently upward toward the Buddha. The left attendant is notable for raising an incense burner in devotion.
7) The Legend of Cheondong and Cheonnyeo – “The Thousand-year Tree that Tied the Sun”
According to My Journey through Namdo (Haneol Media, 2006), the heavenly siblings Cheondong and Cheonnyeo angered the Jade Emperor and were punished to descend to earth and carve Buddhist statues.
Unable to finish before sunset—after which they could never return to heaven—they tied the sun to a sacred tree (Cheonnyeonsu) to prevent it from setting.
Cheonnyeo carved the North Mireuk Buddha, Cheondong the South Mireuk.
When Cheonnyeo finished first, she cut the sun’s tether and ascended to heaven. Cheondong, unable to complete his work, remained behind and became the guardian spirit of Duryunsan Mountain.
Physical evidence: As the legend claims, the North Hermitage houses the completed Seated Buddha, while the South Hermitage holds an unfinished standing Maitreya image, grounding myth in landscape.
8) Geomantic Symbolism and Topography
The Crab Formation and Pagodas: Traditional geomantic lore interprets the Bukmireukam site as resembling a crab—Yonghwajeon Hall forming its body, the eastern pagoda its right claw, and the western pagoda (Treasure No. 301) its left. The pagodas act as balancing anchors, preventing the “crab-body” from shaking as it moves, a metaphor for stabilizing spiritual energy.
The “Stone Sail” (Seokbeom, 石帆): Along the path, an inscription reading “Seokbeom”, literally “Stone Sail”, can be seen.
Daeheungsa is cradled by eight surrounding peaks—Gogaebong, Noseungbong, Garyeonbong, Duryunbong, Dosolbong, Yeonhwabong, Hyeolmangbong, and Hyangrobong—forming a basin-like topography reminiscent of Mount Baekdu’s Heaven Lake, earning the nickname “Little Cheonji.”
Within this landscape, Bukmireukam appears as though floating on water, and thus the “Stone Sail” symbolizes anchoring and stabilizing auspicious energy in place—a geomantic mooring stone for spiritual balance.
9) Visiting Guide and Observation Points
Route: Main Hall → Bukmireukam (approx. 40 minutes via forest trail).
Viewing Sequence: Three-story Pagoda → Rock-carved Buddha—observe both in one vista for compositional harmony.
Key Details to Note:
Triple head and body halos with surrounding flame motifs.
Dual neck folds and robe details on the left shoulder.
Double-layer lotus base (12 downward, 11 upward petals).
Four celestial attendants and their postures.
Linked Visit: Continue to South Mireuk Hermitage to see the unfinished standing Maitreya, completing the legendary narrative.
Geomantic Reflection: From the precinct, note the east-west pagoda symmetry (crab formation), and on descent, find the Seokbeom inscription to contemplate its stone-sail symbolism.
Summary
The Seated Rock-carved Buddha of Bukmireukam embodies the stylistic transition between the Unified Silla and Goryeo periods, the rediscovery and elevation to National Treasure (2005), and the harmonious fusion of artistic precision, local legend, and geomantic meaning.
Together with the twin pagodas’ “crab formation” and the Seokbeom’s “Stone Sail”, it stands as a comprehensive cultural heritage site where history, sculpture, myth, and landscape converge into one profound narrative.
해남뉴스 박충배 편집 및 논설위원 haenamnews@kakao.com